Introduction
Want to sell recurring subscriptions on your Oh My Hi site? This tutorial will guide you through connecting Stripe, creating a subscription form, and making it easy for your customers to manage their plans.
💡 Before you begin: Make sure your site is connected to Stripe. If you haven’t done this yet, follow this tutorial on Stripe setup first.
Step-by-Step Guide
Step 1: Connect Stripe and Enable Webhooks
- Go to Forms > Global Settings in your Oh My Hi dashboard.
- Click on Payment Settings > Payment Methods.
- Make sure Stripe is connected and in Live mode if you’re ready to take real payments.
- Set up webhooks (required for subscriptions). The same tutorial linked above covers how to do this.
Step 2: Enable the Stripe Customer Portal
- Log into your Stripe account.
- Go to Settings > Billing > Customer Portal.
- Activate the portal and copy the portal link.
- This lets your customers update payment methods or cancel subscriptions.
- You’ll add this to the customer confirmation email later.
Step 3: Create a Subscription Form
- Go to Forms and click Add New Form.
- Choose a payment template (any will do—we’ll change it).
- Rename your form (e.g., “Coaching Subscription”).
- Remove the default amount and description fields or any other fields you don’t need.
- Set Payment Method to Stripe.
- Click Add Field > Payment > Subscription.
Customize your subscription:
- Label: Name your subscription (e.g., “Coaching Package”).
- Choose Multiple Pricing Plans if you offer options.
- Select Radio Buttons so users can see all plans.
Example Plans:
- Monthly Plan – $10/month, no signup fee, continues until canceled.
- Annual Plan – $100/year, also continues until canceled.
- Set the field to Required.
- Choose a layout style—Button Type is recommended for a clean look.
Step 4: Add Customer Portal Link to Email
- In the form editor, go to Settings > Integrations > Confirmation Settings.
- Ensure it redirects to a Receipt Page or your custom thank-you page.
- Then go to Email Notifications.
- Under Customer Notification, edit the email body:
- Add:
“To manage your subscription, you can visit our Customer Portal.” (and link it to your customer portal page)
- Add:
Step 5: Add the Form to a Page
- Go to Pages and create a new page.
- Name it something like “Coaching Subscription.”
- Click Add Pattern, search for “Form,” and choose a pattern you’d like to use as the starting point.
- Update the page content as needed.
- Select your new form from the dropdown.
- Publish your page!
Step 6: Test the Experience
- Visit your live subscription page.
- Fill out the form using test data if you’re in test mode.
- Submit to see the redirect to the receipt page.
- Check your email for the confirmation with the portal link.
- Try the Customer Portal to view or manage the subscription if you’d like.
💡 Add Conditions for Subscription Feeds
To keep your automation accurate, you’ll want to set up two separate feeds within the configure integrations feed — one for when a subscription becomes active, and another for when it’s canceled.
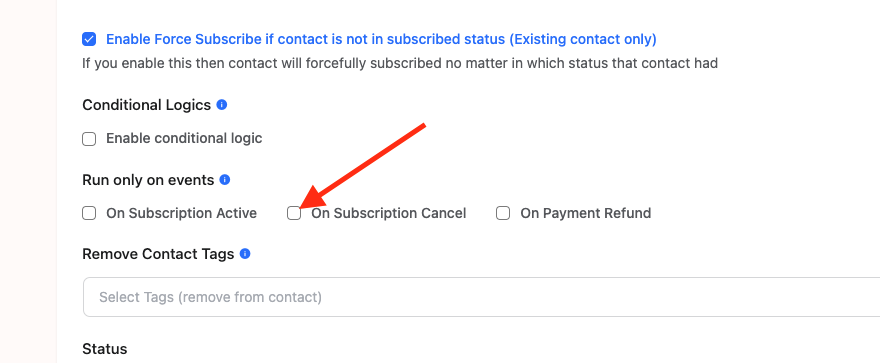
- Active Subscription Feed
- Trigger: Subscription Active
- Action: Apply an Active Subscription tag to the user
- Canceled Subscription Feed
- Trigger: Subscription Canceled
- Action: Remove the Active Subscription tag
(and optionally apply a Subscription Canceled tag)
Once these are in place, you can set up automations to respond automatically when tags are added or removed — like sending different emails for active versus canceled subscribers.
Wrap-Up
You’ve now created a fully functional subscription system with Stripe on your Oh My Hi site! Customers can sign up, pay, and manage their subscriptions easily.
What’s Next?
Visit your live page and share the link with potential customers! You can also customize the styling of the customer portal in your Stripe branding settings if desired.