Introduction
This tutorial is only applicable to customers using the Author template.
This tutorial will guide you through the process of updating or creating a book series page for the author template. A series page allows you to showcase all books belonging to a specific series in an organized and visually appealing way.
Step-by-Step Guide
Step 1: Access the Series Page
- Log into your website dashboard
- Navigate to the “Pages” section
- Look for the series page that comes pre-built with your template (it’s included as a placeholder/example)
- Click “Edit” to open the page editor
Step 2: Update the Series Header
- Once in the editor, open the Document Overview to see all sections and blocks
- Locate the series section at the top of the page
- Click on the header text and type your series name directly into the field
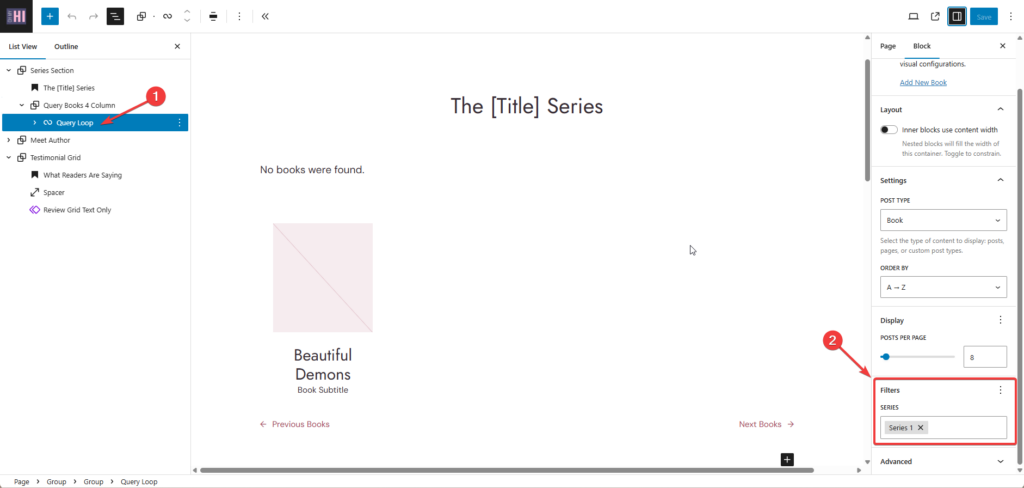
Step 3: Configure the Query Loop Block
- Locate and select the Query Loop block in your page
- Verify that “Book” is selected as the Post Type (this ensures it pulls in your books)
- Adjust display settings:
- Set how many books to display per page (default is 8)
- When you have more books than this setting, pagination will automatically appear
Step 4: Set the Series Filter
- In the Query Loop settings, find the “Filters” section
- Locate the “Series” filter
- If your desired series isn’t showing, delete the current selection
- Start typing your series name in the field
- Select your series when it appears in the dropdown
- This ensures only books from your selected series will display on this page
Step 5: Customize the Post Template (Optional)
- Scroll down to find the Post Template block inside the Query Loop
- This controls what information displays for each book
- By default, it shows:
- Featured image (will display the actual book cover you’ve set)
- Book title
- Book subtitle
- To remove any element:
- Select the element (e.g., book subtitle)
- Press Delete on your keyboard
- (Use Ctrl+Z to undo if needed)
Step 6: Modify Additional Sections (Optional)
- The page includes other sections like “Meet the Author” and “Testimonial Grid”
- To remove any section:
- Select the section from the Document Overview
- Press Delete on your keyboard
- To add new sections:
- Click the “+” block inserter button at the top
- Go to “Patterns”
- Browse or search for a pattern you like
- Click on the pattern to insert it
- Use the Document Overview to drag and reposition the new section
- After adding a new section, customize it as needed:
- Update text content by clicking and typing
- Replace images by selecting them and using the image tools
- Adjust any other elements as required
Step 8: Save Your Changes
- When you’ve finished making all your edits, click the “Save” button at the top of the editor
Step 9: Create Other Series Pages (if needed)
- Clone the first series page you created so you can use it as a starting point
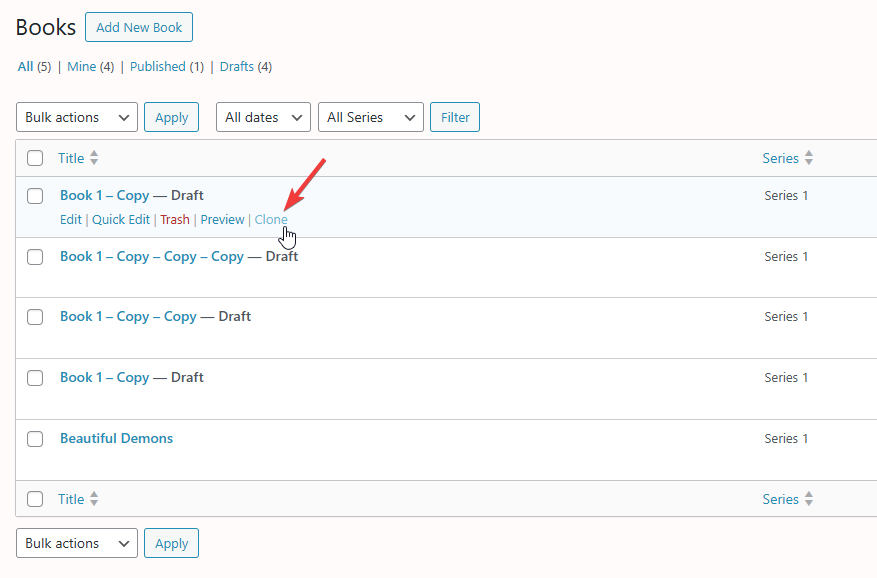
- In the query loop block settings select the series for this page
- Make any other updates to the page as needed
- Publish the page
Notes About Synced Patterns
- Some sections (like “Meet the Author”) may appear as purple blocks, indicating they are synced patterns
- Synced patterns automatically update across all pages where they’re used
- If you edit a synced pattern, the changes will apply everywhere it appears on your site
- For more information about synced patterns, refer to the separate synced patterns tutorial
Best Practices
- Use the pattern library for adding new sections rather than building from scratch
- The pre-built patterns are already configured to look good and be mobile-responsive
- Find a pattern that’s close to what you want, then modify it as needed